ELA Tech Tools: Choose Two and Dive Deep
If you’re just starting school this week, I hope it goes well for you. And if you’ve been teaching for a few weeks now, I hope the sailing has been relatively smooth. Regardless of what grade you teach, being prepared takes a lot of work and dedication.
How about your technology use? There are so many choices these days. It can cause us to rack our brains, for sure. My particular focus is English Language Arts because that’s what I teach these days. I know pairing ELA and technology can be down right difficult.
Maybe I can help make it easier with this advice: Just Do Two.
Keeping your tool choices manageable
Using technology “just for the sake of it” or just because it’s “cool” or “looks neat” is definitely not the route educators want to take. Given our busy lives and time constraints, we can’t afford to wander into blind alleys.
Yes, there are digital tools out there that catch our eye because they seem fun and attractive to students. However, the tools we use in an English class should be chosen with great care.
At workshops and conferences I always recommend teachers select no more than two new tools per year. As educators, we don’t often have enough time to play – much less thoroughly familiarize ourselves – with all the digital tools we find interesting. By choosing just two, we have a much better chance of using them effectively and so do our students.
If this method seems too timid or slow, consider that over the course of five years, we’ll have 10 tools at our fingertips that we know pretty deeply. Some, of course, will expire or be superceded by better ones. But the good news is we’ll have others to fall back on and time to slip the new-and-improved tech into our lineup.
Finding tools worth our time
Before one even begins to choose any digital teaching tools, the ultimate question of Why? should be answered.
- Why am I looking for a tool like this?
- Why is it necessary for my students to use it?
- Why will it increase student success?
Questions like these are exactly what University of Michigan Professor Liz Kolb asks us to consider in Learning First, Technology Second: The Educator’s Guide to Designing Authentic Lessons (ISTE, 2017).
Often times, the initial response to a new digital tool is it looks awesome or really fun. Kolb asks us to think about what the learning goals are before we even consider implementing a digital tool. After we’ve established our goals, we can then think about what tool we want our students to use.
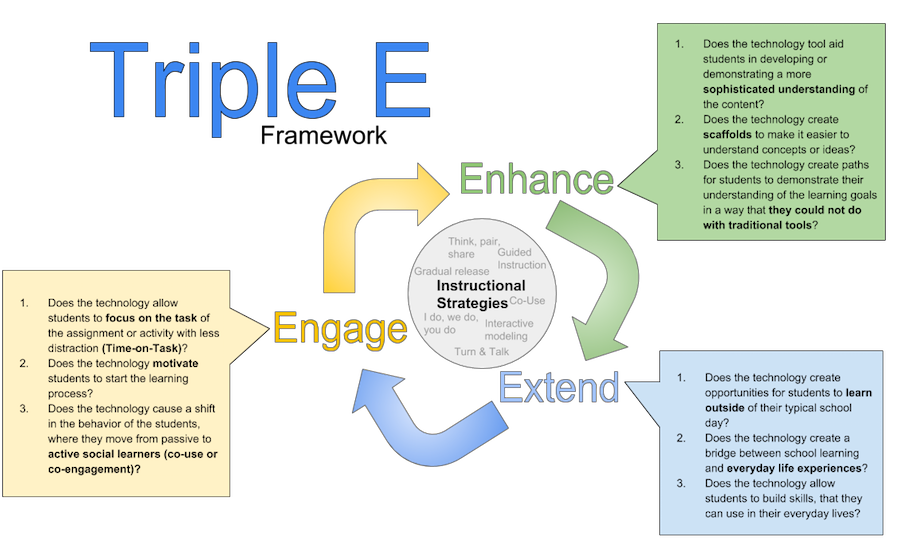
TripleEFramework.com – Click to enlarge
She doesn’t stop there. At this point, using her Triple E Framework, Kolb wants us to think about how the tool will Engage, Enhance, and Extend student learning. I have been using this framework in my own teaching for the last three years and it definitely helps me when considering the digital tools I put in front of my students.
Each category focuses on key questions to consider when implmenting technology. For instance:
- Does the technology motivate students to start the learning process? (Engage)
- Does the technology tool aid students in developing or demonstrating a more sophisticated understanding of the content? Does it favor opportunities for creation/production over mere consumption? (Enhance)
- Does the technology create a bridge between school learning and everyday life experiences? (Extend)
These are just a few of the questions to consider in the different categories Kolb has created. In addition, she has rubrics available on the Triple E website. She also aligns her framework with ISTE standards for using technology in the classroom.
Using the Triple E Framework, let’s consider just two tools that could be used in an English Language Arts classroom.
Google Keep is a keeper
In my last column, What Students Gain by Writing Together, I mentioned the use of Google Documents. There are many other Google Tools out there that can be beneficial to students.
One particular digital tool that can be paired with Google Docs is called Google Keep. Keep is a great tool that helps my seventh graders to stay organized in a number of different ways. Students can use it to create a to-do list, to keep track of vocabulary words, to archive resources they find on the internet or notes taken from class. In essence, you might compare it to interactive sticky notes.
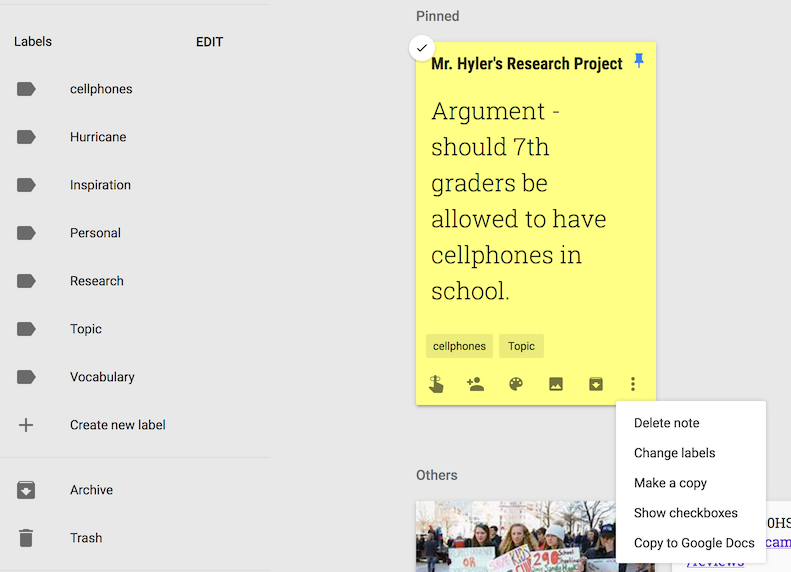
One of the most beneficial uses I have found for my students is having them use Google Keep to track the resources they find on the internet for research or argument papers. I have students create a common label (like a tag) first for the topic of the paper (like “cellphones” in my editor’s example below). Notes can have multiple labels, so “research” or “vocabulary” or others like “images” can be added to sort.
Google Keep
Students can then click on the label and create notes for their individual resources. Students can color code the notes, collaborate with other students, use check boxes, and add images or pictures to the notes. There is nothing more frustrating than when a student finds a resource and doesn’t write it down appropriately and can’t find it later.
Since all the notes are in the cloud, the students can extend their learning outside of school by accessing Keep from home or any device and continuing their research and writing.
In addition, any notes that students take can easily be transferred into a Google Document. This particular feature can make it easy for students to compile their sources for a bibliography or works-cited page. Overall, Google Keep is a beneficial organizational tool for students to use in and out of school. Try it out – it’s really intuitive.
Pinning in Padlet
Staying with the theme of note taking and organization, another great tool that teachers and students love to use is Padlet. Much like Google Keep, Padlet is a bulletin board where you can pin notes, images, and links. Padlet has now added a feature where you can pin videos too. Also, in August Padlet added a feature that lets you record action on your entire screen for up to five minutes (including narration) and place the recording into a pad.
In the Carnegie Foundation’s 2007 Writing Next Report by Steve Graham and Dolores Perin, the authors argue that students in middle and high school can improve writing skills by doing sentence combining activities. In my classroom, I use a Padlet to help students play with sentences and sentence structure.
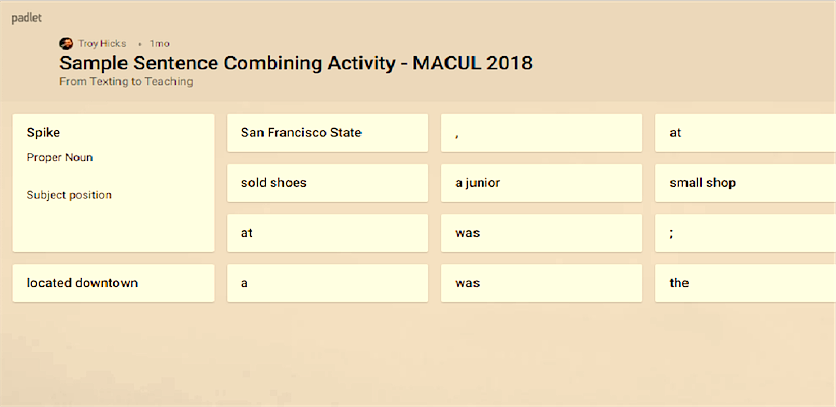
I like to have students create a Padlet account, and then I give them a list of mentor sentences from content we are reading at the time. Then I have the students enter two different sentences onto their Padlet bulletin board word by word (so each word/phrase is a separate item). From there, they can move the parts of the sentence around. I tell my students that sentences are like puzzle pieces that can be manipulated and often times can fit into multiple places and create more than one type of sentence.
An example of a similar Padlet activity that my co-author Troy Hicks and I use when we present at conferences can be seen above (click to make it bigger). The purpose of this activity is for students to better understand the parts of sentences and realize they truly can create different sentences by putting different pieces together. Ultimately they gain a better understanding of sentence components, the different types of sentences, and the value of sentence variety. Afterwords, students can apply the skills they have been practicing with Padlet to the formal writing they turn in to me.
Take a few deep breaths and dive in
Choose one of these tools and explore all the English Language Arts possibilities. Or you may want to try them both out and discover the strengths of each. But remember – set your goals and limit yourself to “deep diving” into only a couple of tools each year. Spend a few minutes doing a internet search for Google Keep or Padlet ideas for ELA classrooms – you’ll be amazed. I’ve truly only rippled the surface here.
Technology does not have to be difficult to implement; it just needs to have purpose and help enhance what our students are doing.
